Who doesn’t love a good rack of ribs? Whether you’re a backyard BBQ pro or just someone who loves indulging in a plate of smoky, tender meat, beef back ribs are a showstopper. In this guide, we’re breaking it all down—from choosing the best ribs to nailing that perfect smoky flavor. Trust me, once you master these, your friends and family will be begging for more.
Understanding Beef Back Ribs
Let’s kick things off by understanding what beef back ribs actually are and why they’re so darn delicious.
What Are Beef Back Ribs?
Beef back ribs come from the rib section of the cow, specifically the area close to the spine. These are the bones left behind after the butcher removes ribeye steaks or roasts, so while they don’t have a ton of meat on top, the meat between the bones is rich, flavorful, and absolutely worth the effort.
Think of them as the beefy cousin of pork ribs—they’re larger, a little less fatty, and pack a ton of beefy goodness. If you’re curious about pairing beef ribs with a classic side dish, our baked beans recipe is the perfect match for BBQ lovers.
“Beef back ribs may not have a mountain of meat, but the flavor is unbeatable—it’s like steak on a stick!”
Nutritional Profile and Benefits
Did you know that beef back ribs are packed with protein? They’re also a great source of iron, zinc, and other essential nutrients. Sure, they’re a treat food, but when done right, they can fit into a balanced diet. Plus, you get all the satisfaction of gnawing on a rib—because, honestly, isn’t that half the fun?
Selecting the Best Beef Back Ribs
Alright, so how do you pick the best ribs at the store? Let’s break it down.
Quality Indicators to Look For
When shopping for beef back ribs, keep an eye out for:
- Good marbling: You want a little fat because it adds flavor and helps keep the ribs juicy.
- Meaty bones: Look for racks where the bones aren’t completely bare. A little meat goes a long way!
- Bright red color: This means they’re fresh. Avoid ribs that look gray or have an off smell.
A pro tip? Ask your butcher for recommendations—they often have the freshest cuts and can give you insider tips.
Fresh vs. Frozen: Pros and Cons
Fresh ribs are ideal, especially if you plan to cook them within a day or two. But frozen ribs can be just as good if you thaw them properly. The trick is to defrost them slowly in the fridge overnight to maintain their texture and flavor. Planning a big BBQ? Don’t forget to include purple sweet potato recipes for a colorful and healthy addition to your menu.
Essential Equipment for Cooking Beef Back Ribs
Before you start cooking, let’s make sure your kitchen arsenal is ready to go.
Oven vs. Smoker: Choosing Your Cooking Method
The great beef back ribs debate—oven or smoker? Here’s the deal:
- Oven: It’s convenient and easy for those who don’t have outdoor cooking equipment. Plus, you can still get juicy ribs with the right technique.
- Smoker: If you’re all about that deep, smoky flavor, a smoker is where it’s at. The long, slow cooking process lets the smoke penetrate the meat, giving it that authentic BBQ vibe.
Either way, you’ll end up with something amazing. It’s all about what works for you.
Must-Have Tools and Accessories
Let’s talk gear. You’ll need:
- A sharp knife for trimming the ribs.
- Tongs to flip and handle the meat without piercing it.
- Aluminum foil for wrapping (trust me, this is key).
- A good meat thermometer to check for doneness.
- Optional but amazing: a smoking box for your grill if you don’t have a smoker.
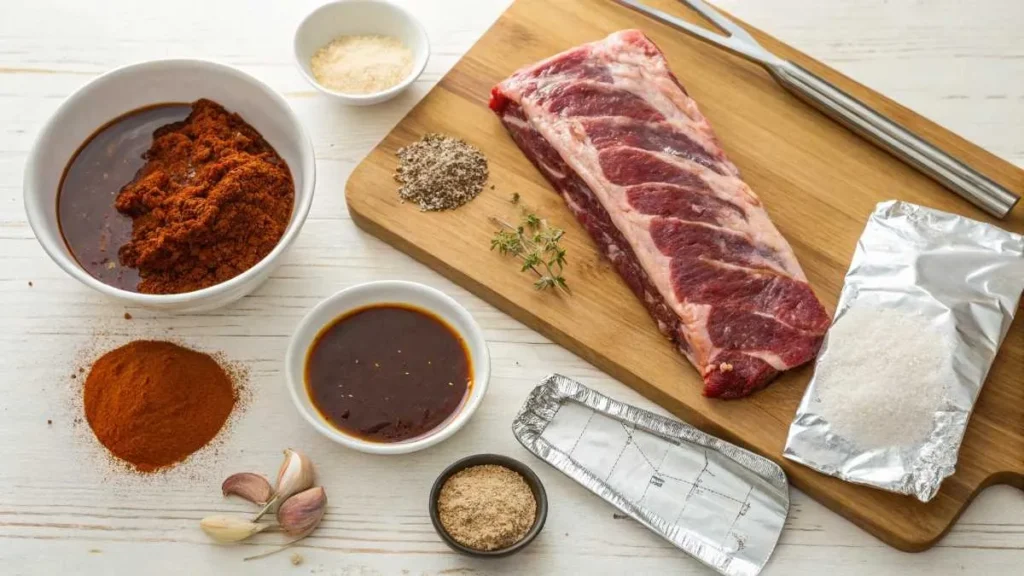
Preparing Your Beef Back Ribs
Preparation is everything when it comes to ribs. It’s like setting the stage for a great show.
Trimming and Removing the Membrane
First things first—flip those ribs over and check the bone side. There’s a thin, silvery membrane covering the back of the rack. You’ll want to remove that because it gets chewy and stops seasonings from soaking in.
Here’s how you do it:
- Slide a knife under the membrane to loosen it.
- Grab the edge with a paper towel for grip.
- Pull it off in one go (or a few tries—it’s tricky sometimes).
Dry Rub vs. Marinade: Which Is Best?
This is a personal preference, but here’s the breakdown:
- Dry rub: Creates a flavorful crust when cooked, locking in juices.
- Marinade: Adds moisture and flavor, especially if you’re cooking low and slow.
For dessert lovers planning the perfect BBQ, try our healthy apple crumble recipe to end your meal on a sweet note.
Creating the Perfect Dry Rub
Now, this is where the magic happens. A good dry rub is like a secret weapon—it’s what gives your ribs that addictive flavor.
Essential Spices and Herbs
Here’s a simple yet knockout dry rub recipe:
- Brown sugar: Adds sweetness and helps caramelize the meat.
- Paprika: For that smoky kick.
- Garlic powder and onion powder: Basics that pack a punch.
- Black pepper and salt: Essential for balance.
- Optional extras: Chili powder for heat or cumin for an earthy flavor.
Balancing Flavors for Optimal Taste
The key is balance—sweet, smoky, savory, and a little spicy. Taste your rub before using it (yep, just dip your finger in) to make sure it’s hitting all the right notes.
“A dry rub is like a good playlist—it sets the mood and makes everything better.”
Cooking Methods: Step-by-Step Guide
So, you’ve picked your ribs, prepped them, and made a killer dry rub. Now comes the best part—cooking. The method you choose will depend on your setup, but honestly, all of these will give you ribs so good you’ll want to brag about them.
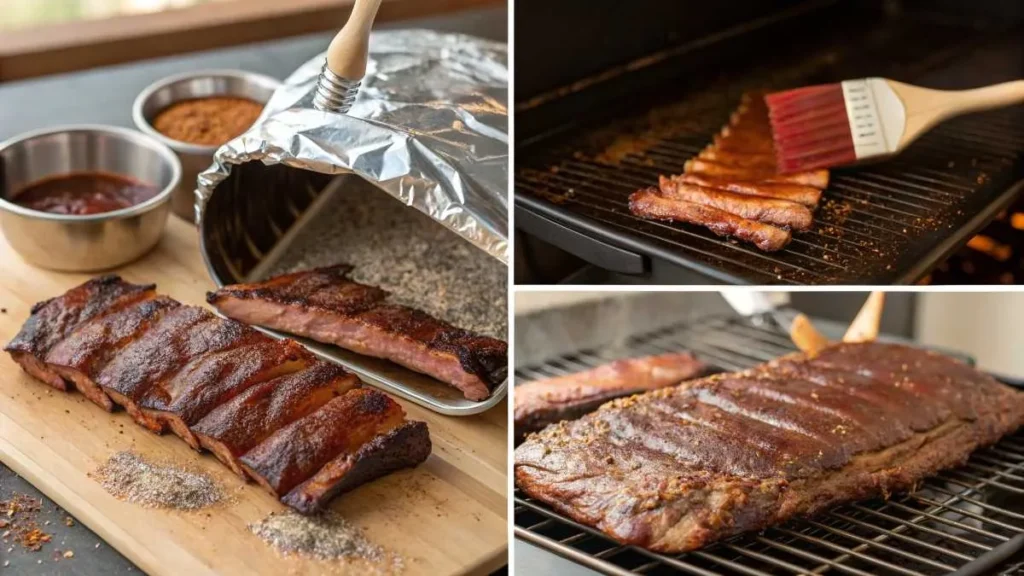
Oven-Baked Beef Back Ribs
Let’s start with the oven, because, let’s face it, it’s the easiest option for most people.
- Preheat your oven to 275°F. Low and slow is the name of the game here.
- Season your ribs generously with your dry rub. Don’t be shy—rub it in like you mean it.
- Wrap the ribs in aluminum foil to keep them moist during cooking.
- Place the ribs on a baking sheet and let them cook for about 2.5 to 3 hours.
Once they’re tender, crank up the heat to 425°F, brush on your BBQ sauce, and pop them back in for 10–15 minutes to caramelize. You’ll know they’re ready when the sauce is sticky and slightly charred—just how we like it. If you’re looking for an easy side, our 4-ingredient guacamole recipe makes a refreshing addition to any BBQ spread.
“If you’ve ever wondered whether oven ribs can be as good as smoked ones, trust me, they totally can. The secret is all in the seasoning and that final glaze.”
Smoked Beef Back Ribs
If you have a smoker, you’re in for a treat because nothing beats that authentic smoky flavor.
- Preheat your smoker to 225°F. Use wood chips like hickory or mesquite for a classic BBQ vibe.
- Place the seasoned ribs directly on the smoker grates, bone-side down.
- Let them smoke for about 5–6 hours, spritzing them with a mix of apple juice and water every hour to keep them moist.
The key is patience. You’ll know they’re done when the meat pulls back from the bones and a gentle tug separates the ribs.
Sous Vide Beef Back Ribs
If you’re feeling fancy (and have a sous vide machine), this method guarantees perfectly tender ribs.
- Preheat your sous vide bath to 165°F.
- Place your seasoned ribs in a vacuum-sealed bag and submerge them.
- Let them cook for 24–36 hours. Yep, it’s a long time, but the results are worth it.
Once done, finish them off on a hot grill or under the broiler with your BBQ sauce to get that caramelized crust.
The Art of Braising Beef Back Ribs
If you want ribs that literally fall off the bone, braising is your best bet.
Creating the Ideal Braising Liquid
For the braising liquid, think rich and flavorful. Combine beef broth, a splash of red wine, garlic, onions, and maybe a dash of soy sauce for umami.
- Preheat your oven to 300°F.
- Sear your ribs in a hot skillet until they’re browned on all sides.
- Transfer them to a Dutch oven, pour in your braising liquid until it’s halfway up the ribs, and cover with a lid.
Let them cook for about 3 hours. The result? Ribs that practically melt in your mouth.
Proper Wrapping Techniques
If you want to go the extra mile, try wrapping the ribs tightly in foil after braising and putting them back in the oven for another 30 minutes. This locks in all that moisture and flavor.
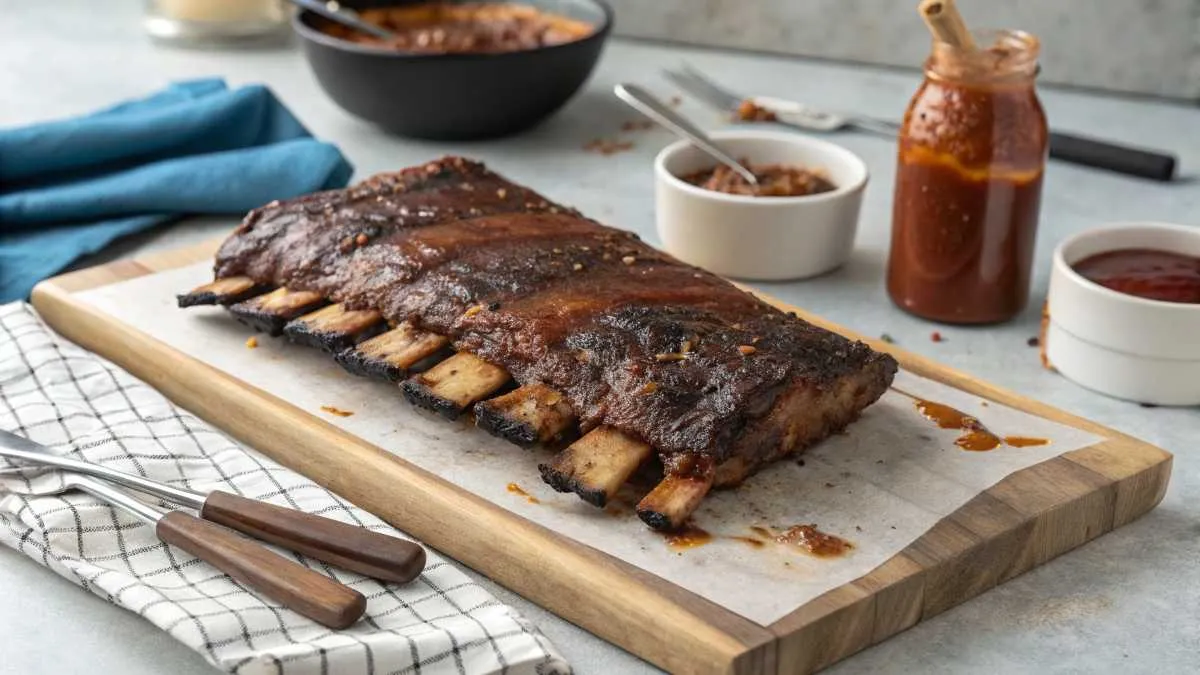
Saucing and Glazing Techniques
What’s ribs without sauce? This is where you can get creative and really bring out those bold flavors.
When to Apply BBQ Sauce
Timing is everything when it comes to saucing. If you apply it too early, the sugars in the sauce might burn. Instead, wait until the last 15–20 minutes of cooking. Brush on the sauce, let it caramelize, and repeat for an extra-glossy finish. For those who enjoy hosting game days, our taco dip recipe makes a crowd-pleasing appetizer alongside ribs.
“Think of BBQ sauce as the icing on the cake—it’s what takes your ribs from good to unforgettable.”
Homemade vs. Store-Bought Sauces
Homemade sauces are great if you have the time. A basic BBQ sauce can be whipped up with ketchup, brown sugar, apple cider vinegar, and some spices. But, let’s be real—there are some amazing store-bought options out there too. If you’re in a pinch, don’t feel guilty about grabbing a bottle of your favorite brand.
Troubleshooting Common Issues
We’ve all been there. You follow the recipe, and yet, something doesn’t feel quite right. Don’t worry—I’ve got your back.
Dealing with Tough or Dry Ribs
If your ribs turn out tough, it’s usually because they didn’t cook long enough. Remember, beef back ribs need that low-and-slow approach to break down the connective tissue. If they’re dry, it could be because they weren’t wrapped or basted during cooking.
Pro tip: Wrap your ribs in foil with a splash of beef broth and pop them back in the oven or smoker for a little longer. It’s like a second chance for your ribs.
Preventing Burnt Edges
Burnt edges can happen if the heat is too high or if the sauce is applied too early. Always keep an eye on your grill or oven temperature, and stick to applying sauce toward the end of cooking.
Serving and Pairing Suggestions
Now that you’ve mastered the cooking process, it’s time to plate up. Let’s make sure your ribs shine.
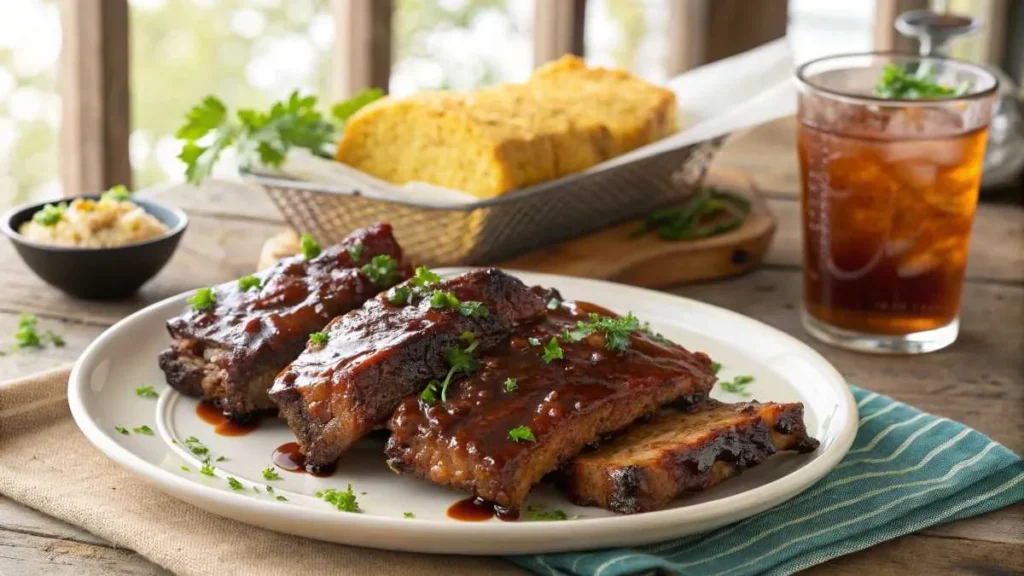
Complementary Side Dishes
Beef back ribs are the star of the show, but the right sides can take your meal to the next level. Some fan-favorites include:
- Coleslaw: A creamy, tangy slaw balances the richness of the ribs.
- Cornbread: Sweet, buttery, and perfect for soaking up BBQ sauce.
- Baked beans: Because, honestly, it’s a BBQ classic.
If you’re a dessert enthusiast, our peach crumble recipe is a must-try to complete your summer BBQ menu.
Beverage Pairings for Beef Back Ribs
For drinks, you can’t go wrong with:
- Beer: A cold lager or IPA cuts through the richness of the meat.
- Red wine: A bold cabernet or zinfandel pairs beautifully with the beefy flavors.
- Iced tea or lemonade: For a non-alcoholic option, these are refreshing and classic.
Frequently Asked Questions
It depends on your preference! Ovens are convenient, smokers give the best flavor, and sous vide guarantees tenderness.
Beef ribs are meatier and come from the plate section, while back ribs have less meat and are taken from the ribeye area.
Yes! They’re flavorful, affordable, and perfect for slow cooking.
Low and slow is key—use an oven, smoker, or braising to break down the meat for tender, juicy results.
Conclusion
Beef back ribs are a showstopper—tender, juicy, and packed with flavor. Whether you bake, smoke, or sous vide, this guide gives you everything you need to nail the perfect recipe.
Ready to serve up ribs everyone will rave about? Save this guide, share it, and let us know your thoughts in the comments. For more BBQ tips and recipes, subscribe to our newsletter and make every meal unforgettable!
Connect with us for more BBQ inspiration and behind-the-scenes content on our Facebook page!